フレームワークとの統合
watchOS アプリの作成
Mac → セクション 5、iPhone → セクション 105 とします。
セクション 5
カスタム通知インターフェイスの作成
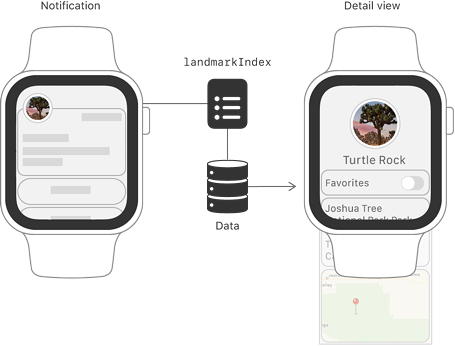
watchOS のランドマークのバージョンはほぼ完成しています。この最後のセクションでは、お気に入りの場所の 1 つに近いことを示す通知を受信する時はいつでも、ランドマーク情報を表示する通知インターフェースを作成します。
注意
このセクションでは、通知を受信した後に通知を表示する方法についてのみ説明します。通知を設定または送信する方法については説明していません。
ステップ 1
NotificationView.swift を開き、ランドマーク、タイトル、およびメッセージに関する情報を表示するビューを作成します。
通知の値は nil にすることができるため、プレビューには 2 つのバージョンの通知ビューが表示されます。1 つ目は、データが全く提供されていない場合のデフォルト値を表示し、2 つ目は、指定したタイトル、メッセージ、および場所を表示します。
ステップ 2
NotificationController を開き、landmark,title, および message のプロパティを追加します。
これらのプロパティは着信の通知に関する値を格納します。
ステップ 3
body() メソッドを更新してこれらのプロパティを使用します。
このメソッドは、以前に作成した通知ビューをインスタンス化します。
ステップ 4
LandmarkIndexKey を定義します。
このキーを使用して、通知からランドマークインデックスを抽出します。
ステップ 5
didReceive(_:) メソッドを更新して、通知からのデータを解析します。
このメソッドは、コントローラのプロパティを更新します。このメソッドを呼び出した後、システムはコントローラの body プロパティを無効にし、ナビゲーションビューを更新します。 その後、システムは Apple Watch に通知を表示します。
Apple Watch は通知を受信すると、通知のカテゴリに関連したアプリ内のシーンを探します。
ステップ 6
LandmarksApp.swift に移動し、LandmarkNear カテゴリを使用して WKNotificationScene を追加します。
シーンは watchOS でのみ意味があるため、条件付きコンパイルを追加します。
テストペイロードを構成して LandmarkNear カテゴリを使用し、通知コントローラが期待するデータを渡すようにします。
ステップ 7
PushNotificationPayload.apns ファイルを選択し、title、body、category、そして landmarkIndex のプロパティを更新します。category は必ず LandmarkNear に設定してください。また、Subtitle、WatchKit Simulator Actions、customKey など、チュートリアルで使用されていないキーはすべて削除します。
ペイロード (payload) ファイルは、リモート通知でサーバから送信されるデータをシミュレートします。
ステップ 8
Landmarks-Watch (Notification) scheme (ランドマーク-ウォッチ (通知) スキーム) を選択し、アプリをビルドして実行します。
通知スキームを初めて実行すると、システムは通知を送信する許可を求めます。[Allow(許可)] を選択します。
ステップ 9
権限を付与すると、シミュレータはスクロール可能な通知を表示し、これには、ランドマークアプリを送信者として識別するのに役立つアプリのアイコン、通知ビュー、通知のアクションのボタンが含まれます。
![]() NotificationView.swift
NotificationView.swift
- import SwiftUI
- struct NotificationView: View {
- var title: String?
- var message: String?
- var landmark: Landmark?
- var body: some View {
- VStack {
- if landmark != nil {
- CircleImage(image: landmark!.image.resizable())
- .scaledToFit()
- }
- Text(title ?? "Unknown Landmark")
- .font(.headline)
- Divider()
- Text(message ?? "You are within 5 miles of one of your favorite landmarks.")
- .font(.caption)
- }
- .lineLimit(0)
- }
- }
- struct NotificationView_Previews: PreviewProvider {
- static var previews: some View {
- Group {
- NotificationView()
- NotificationView(title: "Turtle Rock",
- message: "You are within 5 miles of Turtle Rock.",
- landmark: ModelData().landmarks[0])
- }
- }
- }
![]() NotificationController.swift
NotificationController.swift
- import WatchKit
- import SwiftUI
- import UserNotifications
- class NotificationController: WKUserNotificationHostingController<NotificationView> {
- var landmark: Landmark?
- var title: String?
- var message: String?
- override var body: NotificationView {
- NotificationView()
- }
- override func willActivate() {
- // This method is called when watch view controller is about to be visible to user
- super.willActivate()
- }
- override func didDeactivate() {
- // This method is called when watch view controller is no longer visible
- super.didDeactivate()
- }
- override func didReceive(_ notification: UNNotification) {
- // This method is called when a notification needs to be presented.
- // Implement it if you use a dynamic notification interface.
- // Populate your dynamic notification interface as quickly as possible.
- }
- }
![]() NotificationController.swift
NotificationController.swift
- override var body: NotificationView {
- NotificationView(
- title: title,
- message: message,
- landmark: landmark
- )
- }
![]() NotificationController.swift
NotificationController.swift
- var title: String?
- var message: String?
- let landmarkIndexKey = "landmarkIndex"
- override var body: NotificationView {
- NotificationView(
![]() NotificationController.swift
NotificationController.swift
- override func didReceive(_ notification: UNNotification) {
- let modelData = ModelData()
- let notificationData =
- notification.request.content.userInfo as? [String: Any]
- let aps = notificationData?["aps"] as? [String: Any]
- let alert = aps?["alert"] as? [String: Any]
- title = alert?["title"] as? String
- message = alert?["body"] as? String
- if let index = notificationData?[landmarkIndexKey] as? Int {
- landmark = modelData.landmarks[index]
- }
- }
- }
![]() LandmarksApp.swift
LandmarksApp.swift
- import SwiftUI
- @main
- struct LandmarksApp: App {
- @StateObject private var modelData = ModelData()
- var body: some Scene {
- WindowGroup {
- ContentView()
- .environmentObject(modelData)
- }
- #if os(watchOS)
- WKNotificationScene(controller: NotificationController.self, category: "LandmarkNear")
- #endif
- }
- }
![]() PushNotificationPayload.apns
PushNotificationPayload.apns
- {
- "aps": {
- "alert": {
- "title": "Silver Salmon Creek",
- "body": "You are within 5 miles of Silver Salmon Creek."
- },
- "category": "LandmarkNear",
- "thread-id": "5280"
- },
- "landmarkIndex": 1,
- "WatchKit Simulator Actions": [
- {
- "title": "First Button",
- "identifier": "firstButtonAction"
- }
- ],
- "customKey": "Use this file to define a testing payload for your notifications. The aps dictionary specifies the category, alert text and title. The WatchKit Simulator Actions array can provide info for one or more action buttons in addition to the standard Dismiss button. Any other top level keys are custom payload. If you have multiple such JSON files in your project, you'll be able to select them when choosing to debug the notification interface of your Watch App."
- }
| セクション 1 | セクション 2 | セクション 3 |
| セクション 4 | セクション 5 | |
| セクション 101 | セクション 102 | セクション 103 |
| セクション 104 | セクション 105 |